

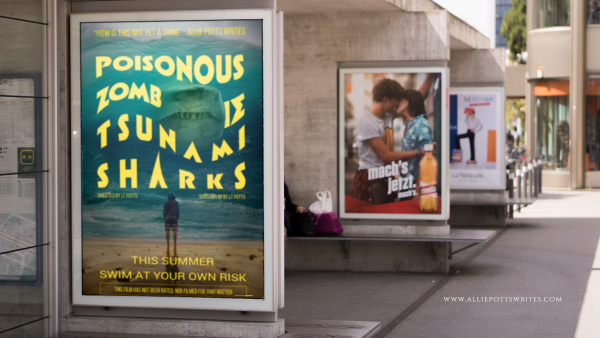
 Earlier this year I featured a mock-up movie poster based on a conversation I’d had with my youngest son. The image produced more comments than anything else I’d published that day. It was a good reminder as to the importance good visuals play in getting a message across.
In full disclosure, I created that image using the Adobe Creative Suite of products, which are powerful, professional grade tools, however, I wanted to find out if I could create similar images with easier to use (and less expensive) applications. Because – why not?
My selection criteria
- Must be able to use masks and layers – This eliminated Microsoft Paint (to be fair, Paint was never really in consideration)
- Must be able to edit photos (meaning change colors, erase bits, etc. not just add filters) – This eliminated Canva
- Must be able to upload as well as download edited images without a subscription – This eliminated PicMonkey
For those of you unfamiliar with the terms above, layers allow you to move and edit isolated elements of a design while masking aids with an element’s transparency and shape.
The experiment
I found Sumopaint and clicked on it’s “Try Online” option. (Note – Sumopaint does require Flash so may not be available on all devices)
 I expected another window to open, but instead, a screen similar in appearance to Microsoft Paint appeared at the bottom of my browser window.
For the purpose of this trial, I planned to add and edit multiple image layers, adjust transparency (opacity), add text, and alter an image’s size and shape (free transform tool).
Now, I had to upload the first image to edit.
I found a nice background photo from www.pixabay.com showing a number of posters hanging in a row. I then used the File>Import To Layer Command to import my mock movie poster for Poisonous Zombie Tsnumani Sharks. SumoPaint automatically created a new layer.
My poster was originally larger than the background. I resized it using CTRL+T which is the shortcut for the Free Transform Tool.
I recommend you resize your image immediately upon import as SumoPaint has a tendency to crop out anything exceeding your window otherwise.

I wanted my poster to go where the map was in the original image, but I also wanted it to look like it was behind the frame.
I moved the layer with the Poisonous Zombie Tsunami sharks to the back so as not to mess it up as I worked on the map.
I selected the layer with sidewalk frames and used the eraser tool. Unfortunately, rather than creating a transparent area as I expected, this resulted in a white area.
Ultimately, I was able to find a workaround by selecting everything in the background image except the white area where the map had been and copying and pasting it as a third layer.
A little decrease in brightness here, a little blur there, and a little more adjustment using the Free Transform>Distort tool and voila.
The results
Having passed my initial test, I decided to try out some of SumoPaint’s additional features such as its filters, color, and text adjustments as well as layer effects resulting in some other mock-ups.


Of course, now I want to write the books to go along with all these covers, but that is a problem for another day.
Final Review
Things I like:
- Can’t beat the price
- The learning curve is relatively short (compared to Adobe Creative suite)
- The User Interface was relatively straightforward and easy to navigate
- The built-in filters can be customized for a unique look
- Colors and gradient maps can be added and adjusted with a click of a button
- Text can be stretched, warped, or otherwise transformed, giving it an edge over most other online editing tools
Things I didn’t like:
- Text can’t be edited once you have released a text box
- I couldn’t find a way to make the background transparent once an image was loaded short of adding a new layer and deleting the old
- Layers would only allow for a handful of text boxes before the program became buggy.
- When transforming an object, the object automatically reverts to 100% opacity until the transform is completed which is problematic if you are trying to distort an object so it matches the shape of something behind it
- There are no rulers or align tools so object placement requires some guesswork (Canva has a clear advantage here)
While Adobe still remains the gold standard in my mind, it is good to know I have another option when I need to perform quick and easy edits on the fly, and now I hope, so do you.

 If you’d asked me a few years ago if I had any addictions, I would have said no. I told myself I didn’t have an addictive personality. It turns out I just hadn’t found my drug of choice – photo editing apps.
 If realism is more your thing, but you still like to add some oomph to your photos, Canva and PicMonkey both offer filters to adjust lighting, contrast, color, and intensity. However, both have their limitations, especially for the free versions. I use Canva if I am trying to also incorporate clip art, stock photos, or text. I used to use PicMonkey if I was trying to soften, sharpen, focus or otherwise add a zoom effect to a photo, but they’ve taken steps in the last few months to make more and more of their better features only accessible to premium users.

