

 Earlier this year I featured a mock-up movie poster based on a conversation I’d had with my youngest son. The image produced more comments than anything else I’d published that day. It was a good reminder as to the importance good visuals play in getting a message across.
In full disclosure, I created that image using the Adobe Creative Suite of products, which are powerful, professional grade tools, however, I wanted to find out if I could create similar images with easier to use (and less expensive) applications. Because – why not?
My selection criteria
- Must be able to use masks and layers – This eliminated Microsoft Paint (to be fair, Paint was never really in consideration)
- Must be able to edit photos (meaning change colors, erase bits, etc. not just add filters) – This eliminated Canva
- Must be able to upload as well as download edited images without a subscription – This eliminated PicMonkey
For those of you unfamiliar with the terms above, layers allow you to move and edit isolated elements of a design while masking aids with an element’s transparency and shape.
The experiment
I found Sumopaint and clicked on it’s “Try Online” option. (Note – Sumopaint does require Flash so may not be available on all devices)
 I expected another window to open, but instead, a screen similar in appearance to Microsoft Paint appeared at the bottom of my browser window.
For the purpose of this trial, I planned to add and edit multiple image layers, adjust transparency (opacity), add text, and alter an image’s size and shape (free transform tool).
Now, I had to upload the first image to edit.
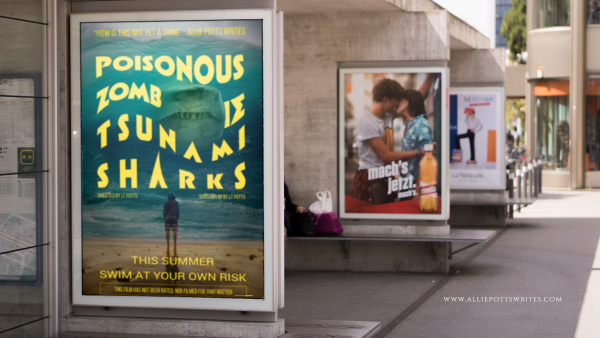
I found a nice background photo from www.pixabay.com showing a number of posters hanging in a row. I then used the File>Import To Layer Command to import my mock movie poster for Poisonous Zombie Tsnumani Sharks. SumoPaint automatically created a new layer.
My poster was originally larger than the background. I resized it using CTRL+T which is the shortcut for the Free Transform Tool.
I recommend you resize your image immediately upon import as SumoPaint has a tendency to crop out anything exceeding your window otherwise.

I wanted my poster to go where the map was in the original image, but I also wanted it to look like it was behind the frame.
I moved the layer with the Poisonous Zombie Tsunami sharks to the back so as not to mess it up as I worked on the map.
I selected the layer with sidewalk frames and used the eraser tool. Unfortunately, rather than creating a transparent area as I expected, this resulted in a white area.
Ultimately, I was able to find a workaround by selecting everything in the background image except the white area where the map had been and copying and pasting it as a third layer.
A little decrease in brightness here, a little blur there, and a little more adjustment using the Free Transform>Distort tool and voila.
The results
Having passed my initial test, I decided to try out some of SumoPaint’s additional features such as its filters, color, and text adjustments as well as layer effects resulting in some other mock-ups.


Of course, now I want to write the books to go along with all these covers, but that is a problem for another day.
Final Review
Things I like:
- Can’t beat the price
- The learning curve is relatively short (compared to Adobe Creative suite)
- The User Interface was relatively straightforward and easy to navigate
- The built-in filters can be customized for a unique look
- Colors and gradient maps can be added and adjusted with a click of a button
- Text can be stretched, warped, or otherwise transformed, giving it an edge over most other online editing tools
Things I didn’t like:
- Text can’t be edited once you have released a text box
- I couldn’t find a way to make the background transparent once an image was loaded short of adding a new layer and deleting the old
- Layers would only allow for a handful of text boxes before the program became buggy.
- When transforming an object, the object automatically reverts to 100% opacity until the transform is completed which is problematic if you are trying to distort an object so it matches the shape of something behind it
- There are no rulers or align tools so object placement requires some guesswork (Canva has a clear advantage here)
While Adobe still remains the gold standard in my mind, it is good to know I have another option when I need to perform quick and easy edits on the fly, and now I hope, so do you.
