Editing Tools For Writers

Writers, whether they pursue traditional publication under the writer-agent model, publish under their own name, or sign with a smaller imprint, need to edit their work prior to submission. However, while some authors believe their background makes them a grammatical expert, the truth is no one should rely on a single set of eyes.

Unfortunately, professional editing services cost money, and as most reputable editors charge by the word, the cost to help you polish a full-fledged novel quickly adds up. I understand the temptation to do without. That said, I’ve also spent more than I would like to admit on editing services for words that, upon hindsight, never stood a chance of making it to the final proof copy.

Thankfully, while no online editing tool or plug-in is good enough to replace a set of human eyes—for now, there are several programs on the market today that can help you identify more than the occasional typo. Many can now check for tone, misused words, readability, and even provide recommendations to help your pacing. Even better, many of them are offered for free or at a price point that is low enough to pay for itself in short order.

As a result, editing software programs are critical applications for every aspiring author’s toolbox and can help you bridge the gap between rough draft and editor ready. I’ve used dozens over the years, some with more success than others. To save you from making many of the mistakes I have, I’ve compiled this list of those I’ve found to be the best for fiction and non-fiction writing.

editing tools for writers

Grammarly

According to my Grammarly dashboard, the program has been correcting my text since 2015, so it’s a tool that has definitely impacted my writing. In fact, it has caught at least three errors in this paragraph since I started typing. That said, I’ve found the program misses errors occasionally when I’ve used it with Google Docs and I’ve had to disable it altogether on certain websites, like VistaPrint, as it doesn’t play nice with their text box editor.

Occasional bug aside, Grammarly has a free plan that works well as a spellchecker online via its browser extensions or as a Word plugin. However, there is also a premium version of the service, which can help you check tone, sentence variability, and make sure you aren’t inadvertently plagiarising online content.

Grammarly Achievements

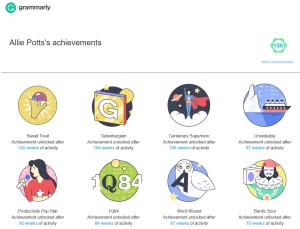
  • Pros – It’s hard to beat free and is great for catching things like passive voice, incorrect punctuation, or misused homonyms in your daily writing. Plus, Grammarly sends out weekly progress reports telling you fun things like how unique your vocabulary is or how long you’ve kept your writing streak going which is great for staying motivated.
  • Cons – It’s much better suited for shorter business or online writing than creative long-form writing as it requires you to disable features like track changes in Word to operate.

ProWritingAid

ProWritingAid is another editing tool you can download and run as a plug-in with Word or Scrivener to check your writing or to check your writing online using its browser extension. Like Grammarly, its Chrome extension is free, however, in my opinion, its paid features, like its overused, cliche, echo, and consistency reports are well worth signing up for the premium version if you are a novelist.

prowritingaid reports

  • Pros – I can’t even begin to describe how much time this tool has helped me save looking for things like a missing quotation mark at the end of dialogue and identifying my clutch words and phrases. It is also more stable than Grammarly in certain web forms.
  • Cons – The plug-in for Word doesn’t always load correctly the first time, which has caused me to shut down Word and re-open my file on a semi-regular basis. In addition, the reports it runs can be somewhat overwhelming and do take a while to complete a check for a full manuscript.

Fictionary

Full disclosure, I am somewhat biased as I was invited to help test an early version of Fictionary, but I absolutely love what this program has to offer (they’ve also added a ton of extra features since then). Unlike all the other tools in this list, which I consider more copy-editing software, Fictionary is designed to help you automate a development edit.

To use it, all you have to do is upload your manuscript and tag where your plot points are located. Fictionary will then tell you if your pacing is too fast or too slow with a graphical representation of the story arc. It can also help point out things that can help strengthen your story like are the five senses represented in each scene of your writing, has a character gone missing from the story, or are you varying your openings and closings enough to keep your reader interested.

Fictionary Story Arc
graphical representation of the story arc from Fictionary.com
  • Pros – While I still put more stock in beta reader feedback than I do a computer program, allowed me to perform a proactive developmental edit before I risked my reputation or burdened advance readers with a two-dimensional story.
  • Cons – Fictionary advertises that it can help you evaluate and revise your manuscript against 38 story elements. This sounds like a pro, until you are actually ready to make all those edits. If you are a pantser rather than plotter, you may not have had a goal for each scene in mind related to the overall plot or may have included scenes you loved to write, but don’t serve any purpose. Tagging all these elements in the software can be overwhelming as well as time-consuming. It’s also not free, which is understandable given its value but does offer a free trial.

Hemingway App

The Hemingway App, also known as the Hemingway Editor is offered as either a online editing tool or as a desktop app designed around making your prose more like Ernest Hemingway’s. That is to say, it will help your writing get right to the point, which is clearly something I need more help with. The tool highlights sentences that it deems too long, identifies adverbs that are keeping you from showing rather than telling, and warns you about passive voice, and gives you a readability score which can help you better connect with your target audience.

HemingwayApp

  • Pros – The free online tool loads quickly and features easy to interpret color codes which change in real-time as you edit your copy. The paid desktop version also lets you publish directly to WordPress and Medium, making it a great editing option for serialized stories.
  • Cons – Not everyone is a fan of Ernest Hemingway’s style of writing. Was I forced to read 127 pages about an old man trying to reel in a marlin? Yes, I was. Did I enjoy it? No, I did not. Also, it does not integrate directly into other word processing programs, meaning you can use it to tweak your copy, but then will need to export it to Word, text, or PDF before you can do anything with it.
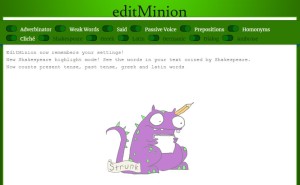
EditMinion

Before I bit the bullet and purchased the premium version of ProWritingAid, I used EditMinion to help polish up my work before sending it out for a professional edit. EditMinion is a completely free online editing program, that helps identify cliche phrases, passive voice, adverbs, and missing dialogue tags. However, it relies on copy and paste, and can only check a chapter of your text at a time.

EditMinion

  • Pros – It’s simple and you can’t beat the price point. Also, because there is absolutely nothing to download, you don’t risk corrupting your files or crashing other applications.
  • Cons – Copying and pasting each chapter one by one into the program can feel agonizingly slow, especially when you feel like you are so close to the literary finish line you can practically taste it. The tool also does not help your writing outside of the app or let you know if you have accidentally misspelled a character name. As a result, I use it when I need a second opinion but rely on the other products for heavier edits.

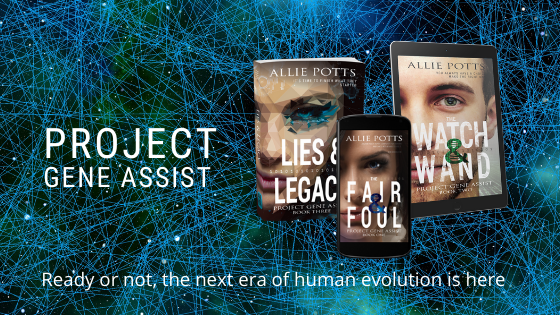
I am delighted to report I have reached the end of an editing project yet again and will be releasing my fifth full-length novel, Lies and Legacy: Project Gene Assist Book 3 to the general public in March 2020. You can read more about this series by visiting my Project Gene Assist book page, or by visiting your favorite online retailer to pre-order a copy.

Project Gene Assist Series Banner

The Outdoorsy App: A Non-Review Review

The best part about the kids being in a scouting program is the excuse it gives us to get out into the great outdoors. The worst part about scouting is then sleeping out there.

After a series of shivering through near-freezing nights and huddling under nothing but a thin piece of treated nylon during thunderstorms, I decided that as much as I enjoy hiking, it might be nice to actually stay under a real roof during our next trip to the mountains. Luckily for me, my other half mentioned he was thinking the same thing.

He told me about an app he’d found called Outdoorsy.

Think of it like Lyft/Uber meets Airbnb/HomeAway. Only, instead of it being a ride-sharing program or app to let you rent out an unused room, you can use it to turn that depreciating asset/eyesore you call a recreational vehicle parked out front into a potential profit center. It also gives a person like me, the chance to actually try to see if RVing is the way to travel.

1998 Coleman Mesa – our home away from home for the weekend

It may be the fact that I live in an urban area and am centrally located between the mountains and the sea, but there were more than a few options for us to choose from when planning our trip. In the end, we decided to go with a 1998 Coleman Mesa pop-up trailer, which, thanks to its low profile, would allow us to travel around the sharp turns of the Blue Ridge Parkway and under NC’s historic stone bridges with ease.

It would also mean we would have a regular sized vehicle during the long weekend for taking us from one trailhead to the next. We thought that extra vehicle would be our truck.

Unfortunately, the holiday weekend meant we weren’t the only ones to hit the road for the weekend. Unseasonable highs hadn’t helped either as people, like us, sought higher ground and cooler temperatures.

We’d been stuck in slow-moving traffic for more than a couple of hours when suddenly the check engine light appeared on the dash. The truck began to groan. If that wasn’t bad enough, we were at the base of the mountains by this point, meaning our cell reception had already begun to degrade.

My other half looked none-to-pleased. He’d just gotten the truck, which is still relatively brand new, checked out by a mechanic prior to our departure. We pushed on, but at a slower, more careful rate. What choice did we have?

Her Royal Highness Approves

We finally limped into the campgrounds where my mom and stepdad (who’d had the foresight to drive separately) sat waiting. The sun hung low in the sky–too low to worry about pesky details like how we were going get home. We sprang into action. One crank raised the roof. Another lowered stabilizing blocks. We sweated in the effort, but it made me glad our rental harkened from good old 1998 when vehicle systems were still more mechanical than computer driven.

The most challenging part about the setup was figuring out where the various poles needed to shape the more tent-like portion of the camper, especially as the sun had fully set by this point, but even that didn’t take too terribly long. Soon we were settling in for a much deserved night’s rest.

Did I sleep better than I might in my regular tent? You bet I did. Though the camper shook anytime someone tried to sneak outdoors to … er… commune with nature, I remained thankful for the mattress under my back and the solid walls that could protect us against any unexpected change in weather.

We spent the weekend hiking and enjoying food cooked over the open flames of a campfire. My kids spotted waterfalls and at least pretended to be interested when the park ranger regaled us with the story of how the river running beside us got its name. Spoiler – it was violent.

Then it was time to return home. Cranks were turned in the opposite direction and support bars were safely stowed. The truck even managed to get us back home. Then all we had to do was drop the keys and the camper back with its rightful owner.

Would I use the Outdoorsy app again? Absolutely. I only wish I could give our truck an equally high rating.


Here are some additional pictures from our trip, which I hope you will enjoy:

This slideshow requires JavaScript.

Dragon NaturallySpeaking – A First Take & Quick Review

This post may contain affiliate links

One of the continuing challenges I faced over the years, and particularly so over the last several weeks leading up to the new year, has been trying to find time for my personal writing when more and more of my time was being taken up by other things. Luckily for me, Santa was kind enough to bring me a Dragon NaturallySpeaking speech recognition software.

Dragon is better than something like Word’s built-in word recognition because it not only asks you for your language during setup, it also asks you to specify your accent. The downside is it still isn’t omniscient out of the box. Therefore, in order to get it to work fully, you have to take the time to train it so it can adapt to you your dialect and your particular speaking patterns.

There are a few versions of the software: Home, Premium, and a version designed for medical transcription as well as variations that differ by included equipment. Mine came with a corded headset and installation disk, though I understand there are other versions out there with Bluetooth enabled devices for people who prefer to walk and talk.

I have a PC and was somewhat concerned that it wouldn’t support my operating system as it shows only Window 7 and Windows 8 icons on the box, especially when the program took ages upon ages to install. At one point during the installation, I started to wonder if I had missed a step. Maybe in order to get the program to launch, I was supposed to hold the box and walk into a firey pyre like Dany did in Game of Thrones in order to hatch her dragons. However, the installation meter did eventually move forward before it came to that and, at the end, I saw an ‘installation success’ message appear on my screen.

I’ve been playing with mine for a couple of weeks now and it’s getting a little less awkward each day, though I now suspect Her Royal Highness is rolling her eyes behind my back at my hypocrisy considering I always am asking her to tone it down when she talks to herself during the day. In my defense, her barking monologues don’t magically transform into written text on the screen.

Thus far, I haven’t had to add too many words to my dragon’s vocabulary, though I’ve been studying up on how best to train it (there are books on the subject specifically for writers). I can’t decide if it is a compliment regarding enunciation or more praise of the software’s programming. (I’m guessing the latter) That being said, it didn’t recognize the word Megalodon and instead returned ‘medic for all,’ when I said it. You might think this isn’t exactly a word that comes up in daily conversation, however, you don’t know my youngest. It comes up in our house. It comes up a lot.

(It also hasn’t recognized any of my swear words either – not that I use too many of them. Clearly, my dragon is of a genteel nature.)

Based on that experience, I realize that it may be a while before it (and I) am ready to tackle more traditional epic fantasy writing based on character names alone. Even so, I managed to write a full day’s personal word count quota in half the time, which is super promising. That even includes all the times I’ve had to go back and add punctuation manually as remembering to say the word comma or period while dictating isn’t natural for me yet either.

As a result, I am feeling quite good about what I might be able to achieve this year. I might even finish the first draft of book three in my Project Gene Assist series before the weather warms. Who knows?!? But if nothing else, at least know I’m trying.

Now, how about you? Are you trying anything new this year?

7 Alternatives to Vellum, or How I Spend My Weekends

5 Alternatives to Vellum - www.alliepottswrites.comVellum. It’s not just for illuminated scrolls. For those of you not in the self-publishing world, or those newer to book formatting, Vellum is also a popular software option that helps magically transform your manuscript from a document processing file into something the non-publishing world might call a book. (This post includes affiliate links)

I know plenty of authors who basically describe it as the bee’s knees when it comes to formatting your book. But what if you are allergic to bees? What do you do then? I say that as a bit of a joke, however, They limit Vellum to Mac users. It’s not cheap to use either, so it isn’t for everyone. Nor is the entire process of book formatting for that matter, but that is an entirely different subject.

So what is an author intent on publishing a new book to do?

I’m glad you asked as I have recently spent far too many hours getting my various books ready for its upcoming publication date by experimenting with Vellum alternatives offering formatted files I could then take to a professional printer.

Microsoft Word

This was my trusted go-to method of getting my books in initial shape for years as it allowed me to tweak font sizes, add decorative flourishes, and basically customize my book’s size and content any way I saw fit. However, Word has an annoying habit of inserting blank pages, “helpfully” adjusting page numbers, and text can be overly stretched with funky spaces between the words if you don’t know some of the advanced tricks.

  • Pros – High degree of control
  • Cons – Takes forever and a day if you don’t know what you’re doing, or haven’t written your entire manuscript with Word formatting in mind (i.e. you didn’t take advantage of Word ‘styles’) and may just drive an author to drink.

Affinity Publisher

A few years ago, I discovered an alternative—Affinity Publisher. The one caveat is, while you can, in theory, use Affinity Publisher to write your novels or text books from scratch, I don’t recommend it. It works much better when you import a Word file, or to a lesser extent a PDF file, with your text and then use the program’s fantastic text and paragraph control features to tweak how words appear on the page. The program costs approximately $54 US, but it is a onetime fee versus an ongoing subscription.

  • Pros – Improved readability compared to Word in terms of text spacing. Much easier to control pesky things like blank pages and funky page numbers.
  • Cons – Occasionally glitches when you try to move pages around after initial import, so save and save often.

Adobe InDesign

InDesign offers a lot of the same customization capability of Word and Affinity, which can help your book stand out from the competition (caution – this isn’t necessarily a good thing). Like Affinity, it also does a better job then Word at handling the space between words on the page. But unlike Affinity, InDesign is no newcomer to the industry. This means there are plenty of tutorials available to help you get started, which is good because it has more features than you even know you need. However, it isn’t cheap.

  • Pros – Highly stable platform with industry leading functionality
  • Cons – it’s an Adobe product, which means a steep learning curve and a high price tag though there is a free trial option.

Scrivener

Scrivener is a word processing and story organization tool specifically designed for books. You can copy and paste your manuscript from another word processor into the software, or import it depending on the file type, and export the Scrivener version as a print-ready PDF. However, it is probably far easier to write the entire project in the software from the get-go. While Scrivener is designed for print books, it also has a partnership with Vellum if you prefer their templates over Scrivener’s offerings provided you are willing to pay the price for both services.

  • Pros – Super easy to export your complete manuscript into a print-ready pdf
  • Cons – The product works best when you write your manuscript from end to end in the tool rather than try to import it from another processing program, and doesn’t offer the same level of customization in your book’s format as offered by Word or InDesign (once again, this is not necessarily a bad thing as some people can’t handle the awesome power that is font selection).

Reedsy

In addition to editing, Reedsy includes a free book formatting service. All you have to do is upload your manuscript into its online user interface, designate elements of your book like chapter name or section separator, select a book size, and a theme. It also is partnered with Blurb, which is a print on demand service, making it easy to print your book once it has been formatted.

  • Pros – Easy to use with a price that’s hard to beat. It even inserts back matter pages for you like your social media links, description (with images) of your other books, and a note about how people can join your mailing list.
  • Cons – There is no desktop app, which means you have to trust the cloud completely with your manuscript, and the user interface isn’t intuitive. Also, you are limited to three themes and three book sizes. Also, you don’t get your formatted file right away, though I only had to wait for a few minutes before I received the email saying my book was ready.

Atticus

Atticus was created specifically as a direct alternative to Vellum for more budget-conscious authors and non-Mac users. However, while it is cheaper than Vellum, it isn’t free. That said, like Affinity, you only have to pay a one-time fee of $147 to purchase it rather than sign your earnings away with a subscription. It is worth mentioning that it is newly released software just out of its initial testing phase. This means that there are some features still in development, but does come with 17 customizable templates, and free updates for life.

  • Pros – You can use the same software to write your book and for formatting it for print and ebook distribution. It also supports both offline editing and online access with automatic backups of your work to the cloud.
  • Cons – As this software has just been released, it may be glitchy and will likely require a number of updates. It will also take a while for tutorials to catch up, so may require more learning through experience compared to other tools.

Outsource it

Of course, you also have the option to outsource book formatting if, unlike me, you are a sensible person who would like to actually spend time with your family or friends on the weekends (or be working on your next book) rather than seated in front of a computer screen waiting for swirling wheels or flipping hourglasses to say your file is ready.

  • Pros – You keep your weekends
  • Cons – You have to trust that your formatter knows what they are doing and, if you find that edits are required in your final proof, it can start getting costly.

But in the end, no matter which path you choose, holding that end product in your hands for the first time is always worth the hassle. Trust me.

How to amaze friends and edit images for free with Sumopaint

How to amaze friends and edit images for free with Sumopaint - www.alliepottswrites.com #graphicdesignEarlier this year I featured a mock-up movie poster based on a conversation I’d had with my youngest son. The image produced more comments than anything else I’d published that day. It was a good reminder as to the importance good visuals play in getting a message across.

In full disclosure, I created that image using the Adobe Creative Suite of products, which are powerful, professional grade tools, however, I wanted to find out if I could create similar images with easier to use (and less expensive) applications. Because – why not?

My selection criteria

  • Must be able to use masks and layers – This eliminated Microsoft Paint (to be fair, Paint was never really in consideration)
  • Must be able to edit photos (meaning change colors, erase bits, etc. not just add filters) – This eliminated Canva
  • Must be able to upload as well as download edited images without a subscription – This eliminated PicMonkey

For those of you unfamiliar with the terms above, layers allow you to move and edit isolated elements of a design while masking aids with an element’s transparency and shape.

The experiment

I found Sumopaint and clicked on it’s “Try Online” option. (Note – Sumopaint does require Flash so may not be available on all devices)

SumoPaint Screen ShotI expected another window to open, but instead, a screen similar in appearance to Microsoft Paint appeared at the bottom of my browser window.

For the purpose of this trial, I planned to add and edit multiple image layers, adjust transparency (opacity), add text, and alter an image’s size and shape (free transform tool).

Now, I had to upload the first image to edit.

I found a nice background photo from www.pixabay.com showing a number of posters hanging in a row. I then used the File>Import To Layer Command to import my mock movie poster for Poisonous Zombie Tsnumani Sharks. SumoPaint automatically created a new layer.

My poster was originally larger than the background. I resized it using CTRL+T which is the shortcut for the Free Transform Tool.

I recommend you resize your image immediately upon import as SumoPaint has a tendency to crop out anything exceeding your window otherwise.

How to amaze friends and edit images for free with Sumopaint - www.alliepottswrites.com #graphicdesign

I wanted my poster to go where the map was in the original image, but I also wanted it to look like it was behind the frame.

I moved the layer with the Poisonous Zombie Tsunami sharks to the back so as not to mess it up as I worked on the map.

I selected the layer with sidewalk frames and used the eraser tool. Unfortunately, rather than creating a transparent area as I expected, this resulted in a white area.

Ultimately, I was able to find a workaround by selecting everything in the background image except the white area where the map had been and copying and pasting it as a third layer.

A little decrease in brightness here, a little blur there, and a little more adjustment using the Free Transform>Distort tool and voila.

The results

How to amaze friends and edit images for free with Sumopaint - www.alliepottswrites.com #graphicdesign

Having passed my initial test, I decided to try out some of SumoPaint’s additional features such as its filters, color, and text adjustments as well as layer effects resulting in some other mock-ups.

How to amaze friends and edit images for free with Sumopaint - www.alliepottswrites.com #graphicdesign
The planet was created with gradients and 3D filters
How to amaze friends and edit images for free with Sumopaint - www.alliepottswrites.com #graphicdesign
The scales were made using a rock texture which I then recolored
How to amaze friends and edit images for free with Sumopaint - www.alliepottswrites.com #graphicdesign
The font for the title is Impact which I then stretched for well… um… greater impact.


Of course, now I want to write the books to go along with all these covers, but that is a problem for another day.

Final Review

Things I like:

  • Can’t beat the price
  • The learning curve is relatively short (compared to Adobe Creative suite)
  • The User Interface was relatively straightforward and easy to navigate
  • The built-in filters can be customized for a unique look
  • Colors and gradient maps can be added and adjusted with a click of a button
  • Text can be stretched, warped, or otherwise transformed, giving it an edge over most other online editing tools

Things I didn’t like:

  • Text can’t be edited once you have released a text box
  • I couldn’t find a way to make the background transparent once an image was loaded short of adding a new layer and deleting the old
  • Layers would only allow for a handful of text boxes before the program became buggy.
  • When transforming an object, the object automatically reverts to 100% opacity until the transform is completed which is problematic if you are trying to distort an object so it matches the shape of something behind it
  • There are no rulers or align tools so object placement requires some guesswork (Canva has a clear advantage here)

While Adobe still remains the gold standard in my mind, it is good to know I have another option when I need to perform quick and easy edits on the fly, and now I hope, so do you.